|
<< Click to Display Table of Contents >> Quick Start Guide for TacServe Server Software |
  
|
|
<< Click to Display Table of Contents >> Quick Start Guide for TacServe Server Software |
|
TacServe COM Port Server
The TacServe COM Port Server program allows a Windows PC to share its modems and serial devices over a network with client computers that use the DialOut/EZ TacServe Edition COM Port Redirector.
The steps below explain how to install and configure the TacServe COM Port Server software. This will allow a PC to share its modems or serial devices with client computers.
First, install the TacServe COM Port Server software on a server computer. Then install the DialOut/EZ TacServe Edition COM Port Redirector software on each computer that will be using the server's COM ports or modems. When finished, any application can use DialOut/EZ to access modems or serial devices that are connected to the PC running the TacServe software.
Configure the Server Hardware
For modem applications, add internal or external modems to the server. Then connect the modems to telephone lines. Verify that the modems are working correctly before installing TacServe.
For serial device applications, add serial ports to the server. Connect the serial ports to serial devices with serial cables. Verify that these devices are working correctly before installing TacServe.
Install the TacServe Software
Log in as Administrator. Run the TacServe setup program, choosing all defaults. To use the TacServe software in trial mode for 30 days, select the Use an Evaluation Key button during the installation. Otherwise, enter a license key in the I have a License Key field. The TacServe Tool will open when the setup program is done.
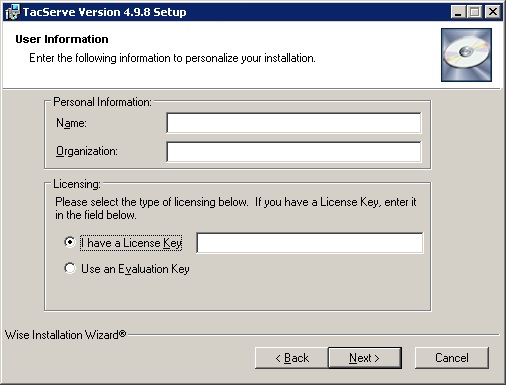
The TacServe licensing window
Configure any Firewall Software Affecting TacServe Connections
The installer will add an exception for TacServe in the Microsoft Windows Firewall. If using other firewall programs, then manually add the allowed application:
C:\Windows\System32\Drivers\TacServe.exe (x86 systems),
or
C:\Windows\SysWOW64\Drivers\TacServe.exe (x64 systems).
Select a Port Group
Open the TacServe Tool, and expand the console tree in the left panel to show the TacServe COM Port Server entry. Expand the TacServe tool to show the Port Groups. If this is the first time installing the TacServe software, then an empty port group named Group 1 will be created. Click to select Group 1, or another port group.
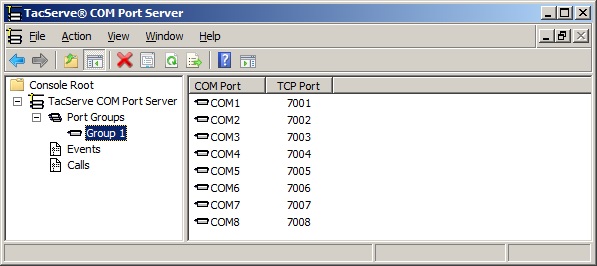
The Port Group window
Set the Port Group Properties
Select a Port Group, then in the Action menu, click Properties. The Port Group Properties window will appear. Change the Group name, if desired. Type in a TCP port number, which DialOut/EZ will use to access the ports in the group. If the ports in this group have modems, then select Enable hunt group to have the TacServe software provide the next available modem. In the Session area, leave the settings at their default values for initial testing. They may be changed later to meet additional application requirements. In the Authentication area, do not select any options for initial testing. These may be used at a later time to meet security requirements.
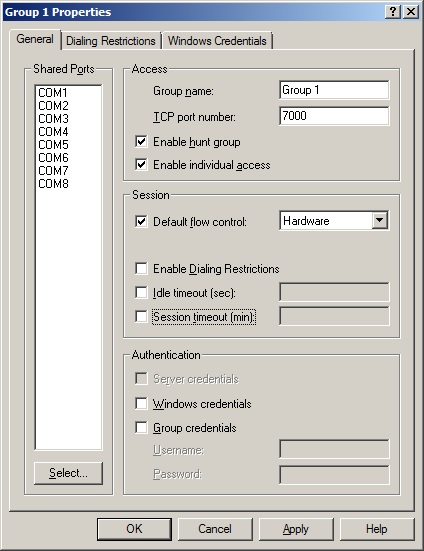
The Port Group Properties window
Select Shared COM Ports
In the Port Group Properties window, click Select. Then select checkboxes to add or remove COM ports for this port group. Click OK to return to the Port Group Properties window. When finished with the configuration of this port group, click OK to return to the TacServe Tool.
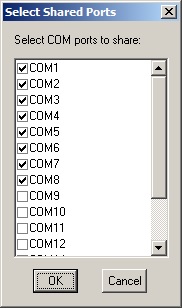
Select Shared COM Ports window
Install DialOut/EZ TacServe Edition Clients
Install the DialOut/EZ TacServe Edition COM Port Redirector on each computer that will be using the TacServe shared COM ports. Continue here for the Quick Start Guide for DialOut/EZ Redirector Software.
Having Issues?
| • | Check the settings for any firewall software that may affect connections being used by TacServe. |
| • | Review the detailed instructions in the rest of the User Guide. |
| • | Review the Frequently Asked Questions and Technical Notes on the Tactical Software website. |
| • | If you have any questions, please fill out the Support Request Form on the Tactical Software website. |